Black Alley Inc

Black Alley Inc

Episode 1.1


Grove City, New Guernsey. 193x

In a small speakeasy at the end of Black Alley, Thomas O'Malley and Al O'Money meet for a quiet drink.


After ordering their Green Shamrock Whisky they wait for Annie to get back to her cleaning.

Tom: "Al, I'm sick of having no money and doffing our caps at all these no good hoods from around the world."

Al: "Well I'm all for making a shilling or two and putting the Emerald Isle on the map in this city - what did you have in mind?"

Tom: "I've been watching the East Side Docks.


Many of the gangs in the city are bringing in their booze through the Docks. The booze is brought in on the boats and each evening it's collected by a gang of Longshoreman who put it into a van and deliver the van to a distribution factory downtown. 


I say we go in there, search for the boxes.........


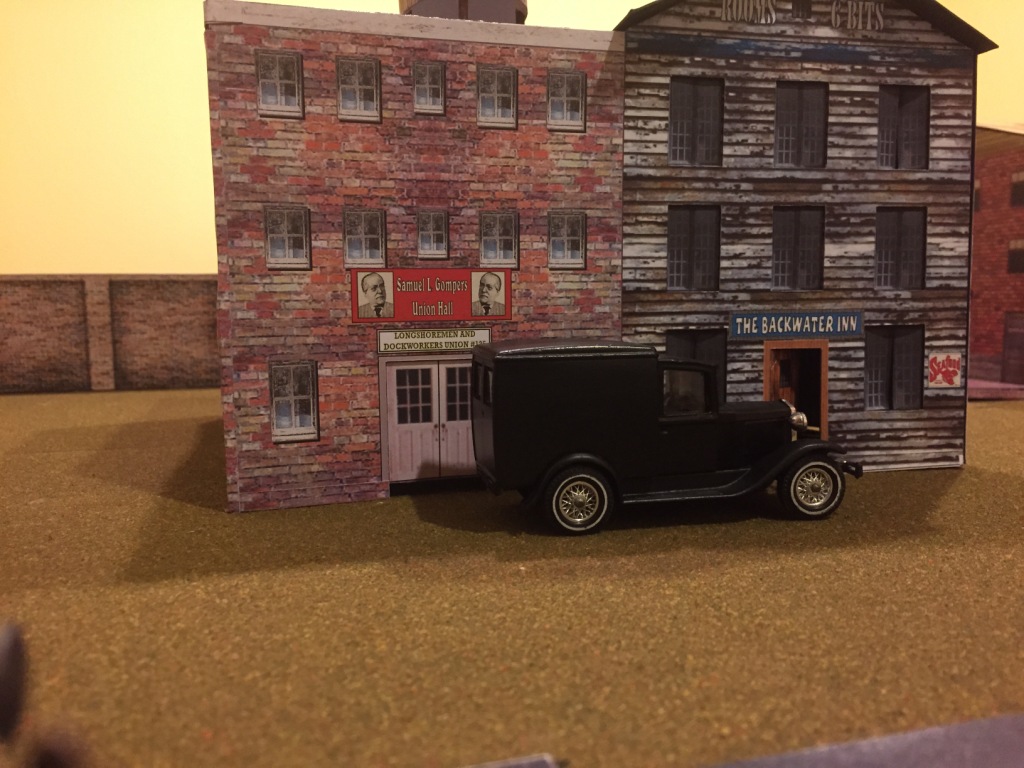
.............borrow the van...................and sell it ourselves. I reckon we could make enough to establish ourselves in this racket!"

Al: "Well Thomas, its a grand plan. Let me round up the boys and we;ll turn the town green!!!"


Mean Streets buildings

So having done the Marine Supplies shed - I have had sufficient confidence to attempt the first Mean streets buildings.

Rather than mounting on Foam card I have printed off on paper and mounted on 450 grm black card. The reason being that I was not convinced I could cut out good windows on the foam card but was reasonably confident I could in the card


The first one attempted was the Harbour masters office and Fish warehouse.

The walls went to gether well but the model proved difficult when it came to the roof - I m not sure if this was due to it not being mounted on foam card with it wall thickness or whether there was a problem with mixed size printing - sometimes it looked like it was "fitting to page" when printing


I cut the windows and doors on the inn as I want to have it at night with light streaming out of it - that worked pretty well. Overall though there is a noticable bulge where I had to force the building together to get the roof to fit so definately not 100% satisfied and I might try making this one again in due course.

Then did the factory. Overall this one went together better as technically I think it is an easier model. I decided not to cut any of the windows off in this one. 

Still, despite the simplicity if the model there were still some problems. - One corner had no wrap around so I had to make my own tab and the proportions on the upper middle wall seem incorrect - it has the acme sign on the wall but it sits below the level of the roof.


As a model though I really like it. Probably more than the Harbour master one. In terms of detail etc though I think the Clever models ones are better and cheaper. I have purchased one of their collections and will make some of them next


New Vehicles arrive to transport people around town

I got these off trade me the other day. The 2 smaller buses were about NZ$12 each. The bigger bus and tram were NZ$22 each I think. All are made by Corgi.

Really like them - will probably dull coat them but not sure whether to shade them too though.


First Figures finished!!!

So the first of the Bob Murch figures are now finished. If I had seen photos of them finished when I was about to start I would have happily taken them. Now I am done I think the army painter has made their faces rather darker than I would have them. This was due to the not stirring then stirring and painting and not sponging of afterwards. Next time will be better. Funnily enough though the photos dont show up much of the shading and they look quite flat and not nearly as dark as they are in real life - clearly I need to experiment with taking photos to get a better final shot.


Which are my favourites? well I really like the marine captain and the guy with the spade - top favourite though is the rather odd choice of the bloke with the baseball bat. Although mostly in browns I really like the way the braces show up against the brown and I really like the tone of the bat. 

House Build concluded

So I have now finished the Marine Shed. Overall I am pretty happy with it. My perfectionist traits might have wanted some things different but I am happy with the finished product


I used pastels on the edges to get rid of the white - it does not cover very well and subsequently when I pick the model up I get it all over my hands so in future I think I will use a black pencil. I have tried pen before but one slip and it all goes badly wrong.

House Building

I have bought several Mean Streets buildings and sets but have been a bit gun-shy making them as the Foam card seems a bit daunting in terms of trying to cut the thing. However I also came across the railway terrain models of Clever Models. I bought their Maritime Supply building as I am wanting to do a dockside Pulp Alley engagement as my first game. I have started to put this together and must say I am really impressed. I think their collections look like really good value and hope to get some soon.

What I particularly like about these is the 3d look they go for - so on the example below the rusted corrugated iron walls have 3 different levels that you stick on the base level so it has some texture.


You might have spotted in the top photo the clamps being used to press the sides together. I saw these in someone else's blog a couple of weeks ago and thought they looked brilliant - but pricey - then saw them in our local craft shop 4 clamps for 3 bucks - have now bought 2 sets and they are worth every cent - used them loads already

Painting of Figures Continues

The first lot of figures are nearing completion now. I have taken a few photos of work in progress. These are from before the adventures with Army painter shading.


Its alive!!

Ok, so every good Pulp villain has some world defeating weapon or doomsday machine complete with surrounding support gizmos. Saw this in Trade me for $15 and ordered it - its arrived and I think its great.


Trials of using Army Painter Quick shade

Ok so just for those among us who struggle with stuff let me just say - when they tell you to tip the can 4 or 5 times to mix up the pigment - what they actually mean is get a bloody big stick and give it a good stir!!!!

I fear my figures are now going to be way over cooked as I dipped and spun on the drill and when I took them out they seemed to be no different. Having done them all I was convinced they should have more pigment so stuck a stick in and gave a stir. Sure enough there was all the pigment on the bottom - give it a quick stir and it was looking much darker.

Looked at the figures and thought I would paint it on given the amount already on - having done that - think I was still too heavy handed.

Now hoping that in drying it will lighten - worse case scenario I can repaint.......

Too much eye candy

Well not many posts this month but my Pulp figures have arrived (plus a 2nd lot) and I have started to paint them. As a rule I am a bit of a perfectionist without the diligence and so this has been a slow process for me. I am just wondering if others suffer from the eye candy depression?

My painting skills are not good and when I look at the pictures of these figures on the web I become a bit despondent. Am I alone in that - I have never used army painter dip before and am hoping that it will make all the difference.....not sure if it will though.

Still I reckon the first 12 should be completed by middle of next week.

Carrying too much baggage

Ok, so getting back into a more positive mode - the new luggage has arrived and it looks great.


These come from Slug Industries:

https://slugindustries.files.wordpress.com/2014/11/slugindustriescatalogueweb1.pdf

Philip Page runs this enterprise and he was really helpful and amazingly quick to respond to my inquiries.

The quality of the casting is good with no air bubbles or dodgy bits. Not sure how they will paint up given my general level of incompetence but I'm looking forward to the opportunity which is as much as I can ask for really.